5 Easy Steps To Get Your Website Onto Google Page 1

Started a business and wondering how your competitors manage to get their websites onto that coveted first page of Google? Ranking highly for search terms such as ‘personal trainer + [your location]’ can greatly benefit your business by increasing your monthly customers and improving your brand’s exposure. Combined, these changes will ultimately lead to an increase in your business’s revenue.
But how do you get your site to rank for these local search terms? Especially when your competition is equally cottoned on to the techniques and is already reaping the benefits.
Unfortunately search engine optimisation (SEO) for any industry website is not a quick, one-time process and you should be wary of any SEO company that offers this as a service. Ranking highly on Google and other search engines requires a combination of knowledge, understanding, best practice and persistence. In short, it’s a long-game, adjusted to suit ever-changing algorithms.
That doesn’t mean however that you should give up before even starting. If your business is just beginning to utilise SEO and you are looking for SEO tips to steer your site in the right direction, then the five steps described in the rest of this article can give you the necessary foundation to help Google start recognising and crawling your site.
Before You Begin...
Before you start working your way through our SEO steps it is important that you understand the basics of how Google results pages work and how they have changed in recent years. Ever since mobile technology, such as tablets and smartphones, became a common commodity increasing amounts of people are opting to conduct searches from these devices over desktop.
Google understands this and has changed the way it displays its results to provide the best system it can to fulfil the changing requirements of its users. Through developed technologies Google is also able to get a user’s approximate location based on the following:
- The user’s IP address.
- The Location History if it is turned on.
- Google Toolbar’s My Location feature if it is turned on.
- Recent locations that have been searched for.
If you have been using Google for a while you may have already be aware of the changes and if you are even more in the loop you may even have noticed the changes to Google + Local listings specifically. The new results pages for local searches (those with a place name) often include a map with pinpoints of relevant results and three businesses listed below.
You can see an example of what we mean in the screenshot below:
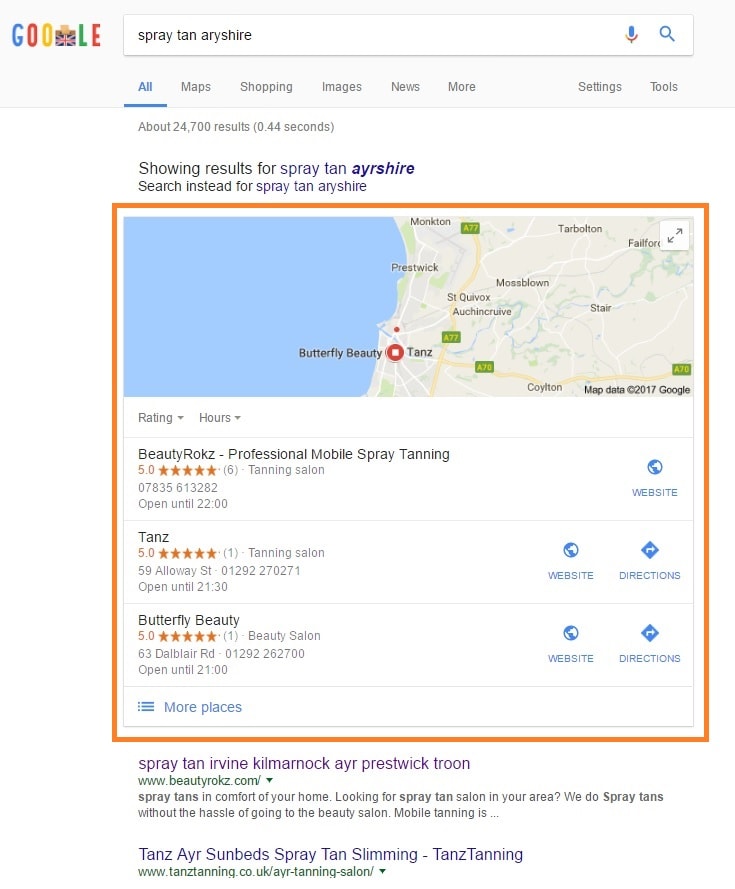
Where there would once be around four or five organic (non-paid) results, such as Ayrshire Spray Tan Salons in the example above, the Google + Listings box now commands that space. Studies have shown how many users are likely to explore the map function or click on the results shown in this box before exploring the results below so getting your own webpage on here is crucial to increasing visibility.
If your business has a physical address and provides products or services to a geographically targeted area, then tailoring your online goals to rank in these local searches can really become a valuable expedition.
Here are 5 steps to help you achieve that goal.
STEP 1: Claim your Google My Business listing
Last year Google made the move to create Google My Business, a unified interface aimed to help make life easier for local business and brands. Using Google My Business is crucial in helping get your business on the map, literally. Google+ pages are now managed through the Google My Business dashboard so if you already have a Google + page you will easily be able to set up a My Business page.
As a local business, a Google + Local listing is going to be one of your most important online marketing tools. The first step to getting your business showing on map results is to claim your location via Google My Business. You can do this by visiting this link and setting up an account, or logging in if you already have a Google Account.
Once you have done this you will need to choose between Storefront, Service Area and Brand as your business type. The former help you find an existing business, whilst the Brand option is reserved for those wishing to create a non-local Google+ page.

STEP 2: Verify your Business on Google
After creating your Google+ and My Business pages you will need to verify your business. Once you have set up your account you will be able to search for an existing listing using an address, or create a new one if no business exists. You will be sent a verification mail through the post (how old fashioned) although in some circumstances can be done via phone of instantly (visit this webpage for more information) which you can use to claim your listing.
Once you have claimed and verified your listing you should add images of your business and post relevant and engaging content using keywords and hashtags. You can even create a 360 degree tour, such as the example from The Berkeley Clinic below:

It is important that you keep the information up to date including your opening hours and post updates regularly. Regular posts allow Google to see you are active and this helps build authority for your business.
STEP 3: Optimise for mobile
Google have openly showed their preference for responsive websites (those which adjust to the size and resolution of different screens) and penalize websites which are non-responsive. You can check if your website it responsive here.
A responsive website has also proven a great way to decrease your website’s bounce rate as users are able to navigate more easily and don’t have to pinch the screen to access information. The need for a mobile site is imperative in today’s market and will only set to continue. Not having a responsive site will seriously limit your website’s ability to grow and rank.

STEP 4: Get to grips with the basics of SEO
As a starting point for checking your website’s SEO you can use free tools such as the Local SEO Checklist to see all the areas your website is missing. Checking all the boxes will help you to tell Google your website if a quality one and the right site for your given location. Another great way to boost your business’s SEO efforts is through producing great quality content. Adding a blog to your website offers a simple way to do this, for free.
STEP 5: Reviews = Gold Stars = Clicks & Rankings
Once your Google page is up and running you can start asking customers for reviews.
Reviews have proven time and time again to be a key influencer in click rates. Your business will need at least five reviews to get the stars showing on your results and since Google bought over YouTube many people already have a Google account setup, making the review process even more straightforward.
If you are looking for a simple way to ask your customers for reviews you could try using follow up emails after appointments or recent purchases to link clients to your page to review. If the experience is fresh in their minds, they will be more likely to fill out a review so make sure you don’t miss the opportunity and provide timely follow-up emails.
It is also a good idea to reply to reviews to help add personality and warmth to your business. If a potential customer is searching for your product or service in your area then they will often read what others have to say about their experience, good or bad. Reading a response from your business can help them get a feel for your professionalism and can also be a good way to encourage others to review. It is also important to respond to negative reviews so that potential customers can see your level of customer care.
Digital Marketing Help from The Experts
The above steps are just some ways that you can use to start improving your website’s online presence. Following them will help your business to show for local listings, a key part of search in today’s world. For more help or advice, just contact our team here at Kommand!

- Tagged as: